ELEARNING TUTORIAL—ADVANCED
The project already has several topics, which we will use as learning blocks as part of the course. We also need some additional learning blocks containing questions and answers. In other words, our eLearning course will consist of several topics that learners can navigate through; some of the topics will simply display information, while others will have interactive question sections and feedback.
[Menu Proxy — Headings — Online — Depth3 ]
How to Add Folders
-
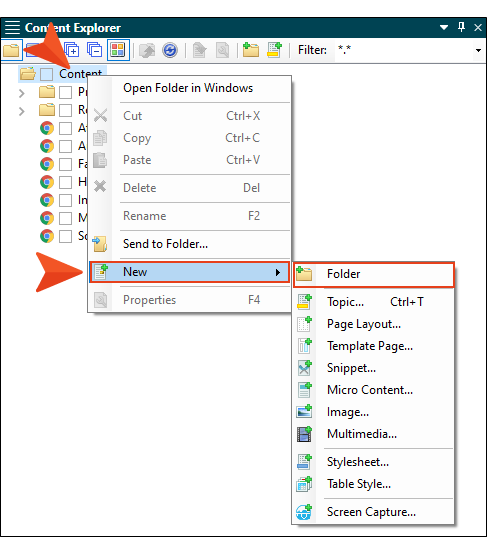
First, let's create some folders to organize the new topics that we'll be adding. In the Content Explorer, right-click the root Content folder, and from the context menu select New > Folder.

-
Type Knowledge-Check-Topics as the name of the folder, and press ENTER.
-
Repeat these steps to add another folder named Test-Topics.
Knowledge check topics consist of information that is relayed to a learner, but the learning exercise is not formally graded. You have the option to track if the learner completed the course or not. In this tutorial, we'll add a couple of knowledge check topics in the middle of the course.
Test topics consist of quiz questions with specific answers that are graded. A quiz is a basic way to determine a level of knowledge. It can reveal gaps in knowledge. We'll add some test topics at the end of the course.
Either knowledge checks or test results can be tracked by integrating them with an external learning management system (LMS). We'll go over this more later (see Creating and Developing Targets and Accessing the LMS Package).
Note On the next page of this tutorial, we have included an optional knowledge check.
How to Add Topic Files
-
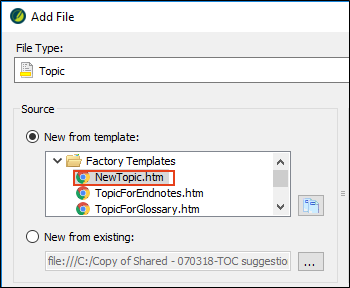
In the Content Explorer, right-click the Knowledge-Check-Topics folder, and from the context menu select New > Topic. The Add File dialog opens.
-
Under the Factory Templates, select the NewTopic.htm template.
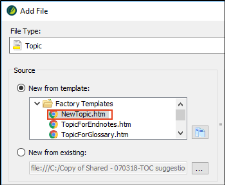
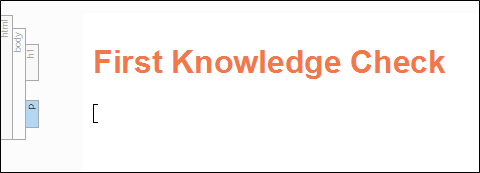
- In the File Name field, type First Knowledge Check as the name for the first new topic.
-
Click Add. The topic is added to the Content Explorer, and the XML Editor opens to the right, displaying the topic.
-
Add another topic to the same folder, and name it Second Knowledge Check.
-
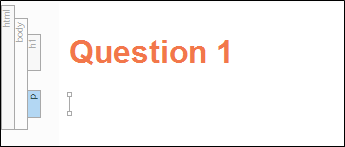
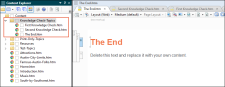
Add a third topic in that folder and name it The End.
Here is what you should see.
-
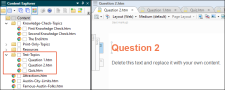
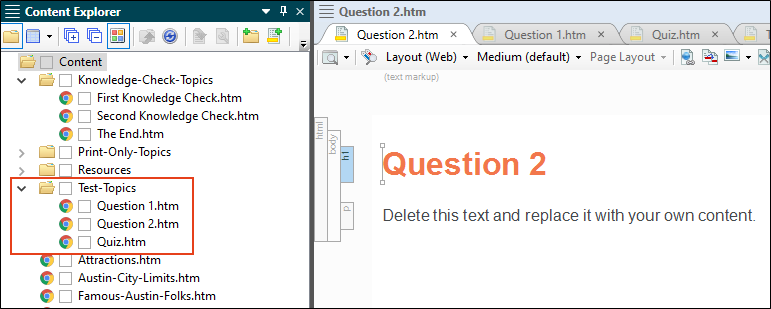
Repeat the steps above to add the following new topics under the Test Topics folder:
Quiz
Question 1
Question 2
Here is what you should see.

How to Add Content to the Knowledge Check Topics
-
Open the First Knowledge Check.htm topic. (You can either double-click the topic file in the Content Explorer, or select the tab at the top of the editor area.)
-
Delete the placeholder text under the heading so that it's an empty paragraph.

-
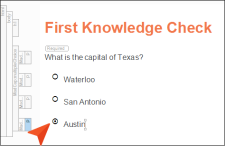
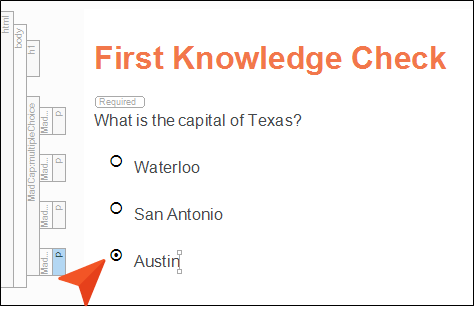
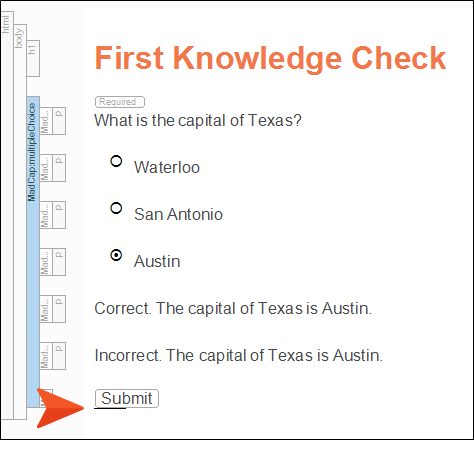
In the eLearning ribbon at the top of Flare, click Multiple Choice (with the circles).

-
For the question, copy and paste this text:
What is the capital of Texas?
-
For the first answer, enter Waterloo, and press ENTER.
-
For the second answer, enter San Antonio, and press ENTER.
-
For the third answer, enter Austin. This time, do not press ENTER, since this is the last answer for the question.
-
Click the circle next to Austin, since that is the correct answer.
-
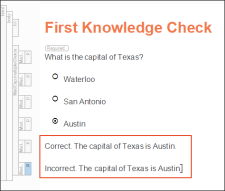
Now let's add some feedback, depending on whether the learner chooses the correct or incorrect answer. In the eLearning ribbon click Add Feedback.
Tip You can also right-click a MadCap structure bar to the left of the content to add feedback (or perform other eLearning tasks).
-
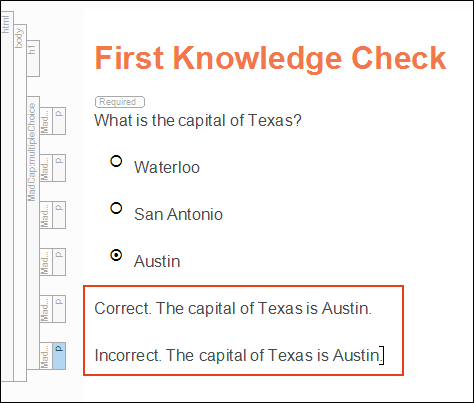
Replace the first line of text with this:
Correct. The capital of Texas is Austin.
-
Replace the second line of text with this:
Incorrect. The capital of Texas is Austin.
-
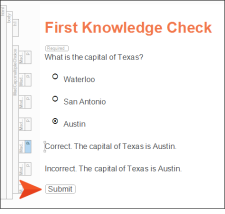
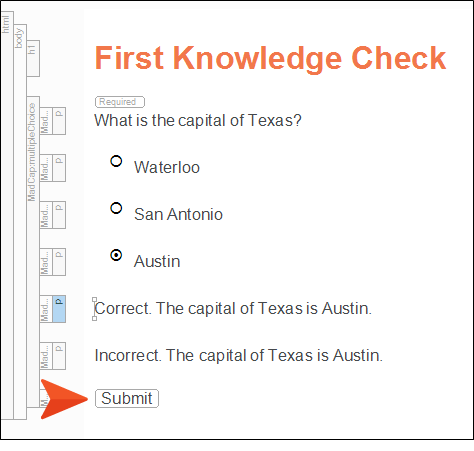
Next, we need a button so that learners can submit their answer. So in the eLearning ribbon click Add Submit Button. A button with the word "Submit" is added at the end.
-
We're going to add another question section after this one. But this time, we will allow multiple selections. To begin, click after the Submit button in the topic, so that you see the flashing horizontal cursor under it.

-
Press ENTER.
-
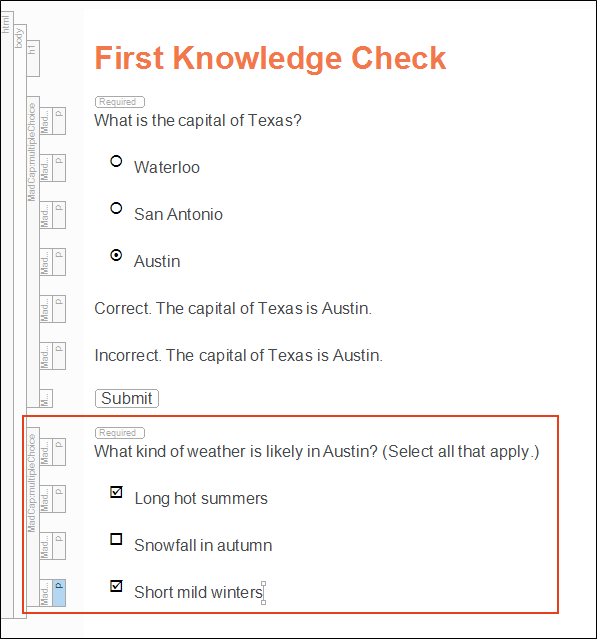
In the eLearning ribbon, click Multiple Response (with the squares).

-
For the question, copy and paste this text:
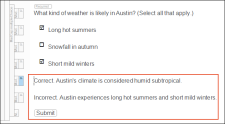
What kind of weather is likely in Austin? (Select all that apply.)
-
Add the following three responses, pressing ENTER after the first and second answers, but not the third:
Long hot summers
Snowfall in autumn
Short mild winters
-
Click the first and third check boxes as the correct answers.

-
Use the Add Feedback button to provide the following:
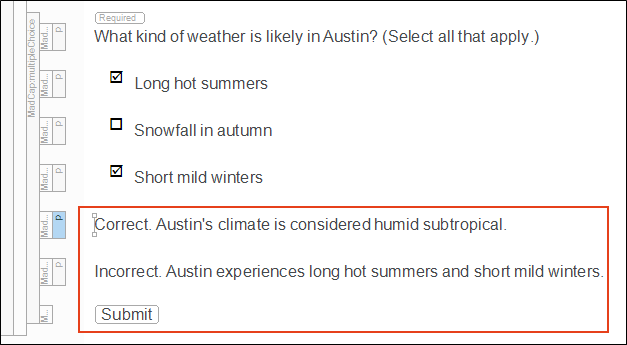
Correct. Austin's climate is considered humid subtropical.
Incorrect. Austin experiences long hot summers and short mild winters.
Then click Add Submit Button.
Tip You can also start by selecting just Add Submit Button. This will add not only the placeholder feedback text, but the Submit button as well.
-
Click
") to save your work.
to save your work. -
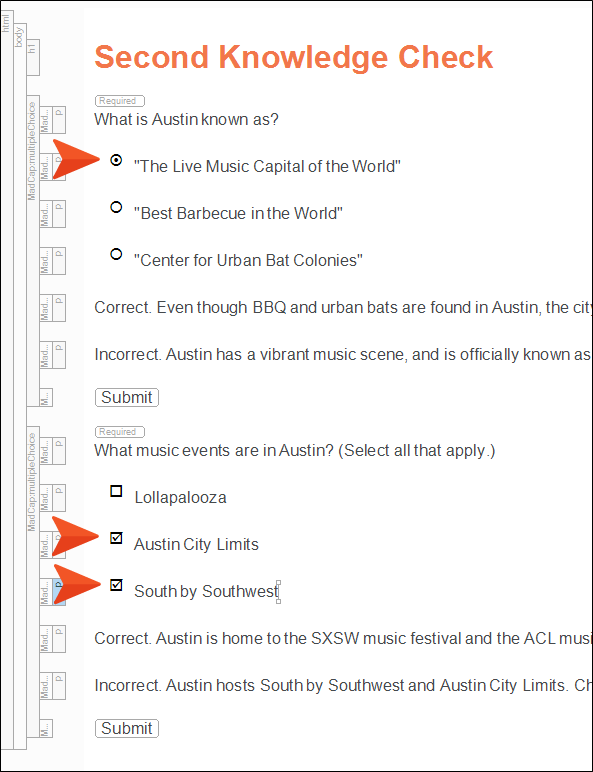
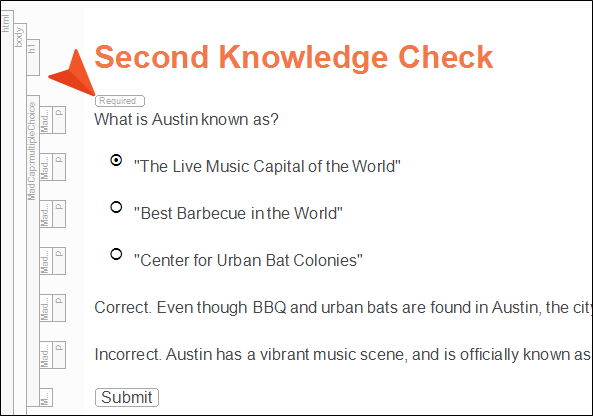
Open the Second Knowledge Check.htm topic. In the same way as above, add two question sections. Copy and paste the following text (a multiple choice first, then a multiple response), add submit buttons, and set the correct answers as shown in the image below.
First Question Section
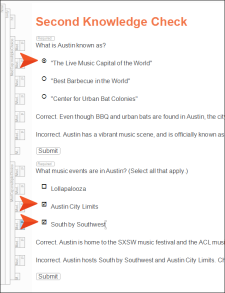
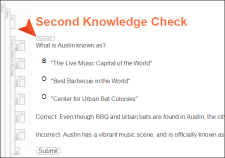
What is Austin known as?
"The Live Music Capital of the World"
"Best Barbecue in the World"
"Center for Urban Bat Colonies"
Correct. Even though BBQ and urban bats are found in Austin, the city is known for its vibrant music scene. Its official slogan is "The Live Music Capital of the World."
Incorrect. Austin has a vibrant music scene, and is officially known as "The Live Music Capital of the World."
Second Question Section
What music events are in Austin? (Select all that apply.)
Lollapalooza
Austin City Limits
South by Southwest
Correct. Austin is home to the SXSW music festival and the ACL music festival.
Incorrect. Austin hosts South by Southwest and Austin City Limits. Chicago hosts the Lollapalooza music festival.
-
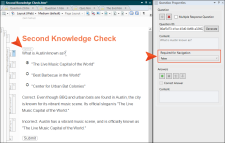
Notice the small markers indicating that both of these questions are required, just as they are in the First Knowledge Check.
This means that learners must answer the question in order to use the navigation button (which we'll add soon) to proceed to the next page of the course. Let's make both of the questions in the Second Knowledge Check optional, which means learners do not have to answer them before moving to the next page. In the eLearning ribbon, click Question Properties.
Note Markers are shown only when you're working in the XML Editor in Flare; they are not shown in the output. To enable or disable markers, go to the local toolbar at the top of the XML Editor, click the Show Tags
 drop-down field, and then select Markers.
 -
Click any of the content for the first question section (i.e., the question itself, any of the answers, the feedback, the submit button). The Question Properties window pane to the right contains some fields that reflect the properties for that element. Even as you click on different parts of that question section, you will see the values for the fields changing (e.g., click the different answers to see which is set as the correct one in the window pane). We're not going to use or change most of the options in the window pane for this tutorial
Note In addition to setting questions as required (or not) individually using the Question Properties window pane, you can set it on the MadCap|multipleChoice style in your stylesheet. For example, if you don't want any of your questions to be required, setting the mc-required-question property (located in the Unclassified section of the Stylesheet Editor ) on this style to false can save you a lot of time, so that you don't have to set each question one at a time from the Question Properties window pane.
-
Do the same for the second question section in the topic. Now both questions are optional.
-
Click
to save your work. -
Open the topic called The End.htm. We're not going to add any question sections to this topic. We're simply going to use it to show that the learner has reached the end of the course. Paste the following text into the topic, replacing the placeholder text:
This is the end of the course. Thanks for learning all about the city of Austin, Texas.
-
Click
to save your work.

Note In this tutorial we are selecting options in the eLearning ribbon to add placeholder content for questions and answers. However, you also have the option of converting existing content into question sections. Just use your mouse to select the content and then select Multiple Choice or Multiple Response in the eLearning toolbar. The first paragraph of your selection will become the question and each paragraph under it will be an answer.
How to Add Content to the Test Topics
-
Open the topic called Quiz.htm. Again, we're not going to add any question sections to this topic. It's purpose is simply to inform people that they are at the beginning of the quiz. Paste the following into it, replacing the placeholder text:
This is the start of a short quiz to test your knowledge about Austin. Navigate to the next topic to begin the gradable portion of the course.
-
Click
to save your work. -
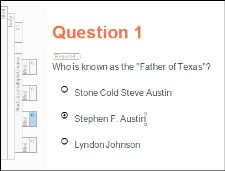
Open the Question 1.htm topic.
-
Delete the placeholder text under the heading so that it's an empty paragraph.
-
In the eLearning ribbon, click Multiple Choice (with the circles).
-
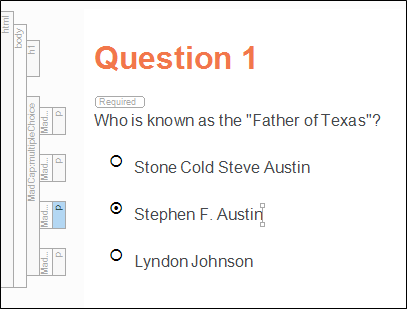
For the question, copy and paste this text:
Who is known as the "Father of Texas"?
-
Add the following three answers:
Stone Cold Steve Austin
Stephen F. Austin
Lyndon Johnson
-
Click the circle next to Stephen F. Austin, since that is the correct answer.
-
Click
to save your work. We're not adding feedback or a Submit button this time, because we don't want learners to see instant feedback. We could add just feedback without a Submit button, in which case the feedback content would be shown at the end on the quiz results page. But in this tutorial, we're going to just let that page show the results, instead of any additional feedback.
-
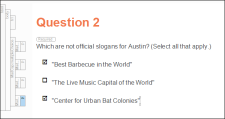
Open the Question 2.htm topic.
-
Delete the placeholder text under the heading so that it's an empty paragraph.
-
In the eLearning ribbon, click Multiple Response (with the squares).
-
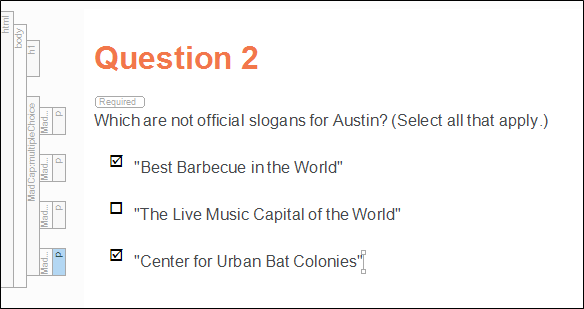
For the question, copy and paste this text:
Which are not official slogans for Austin? (Select all that apply.)
-
Add the following three answers:
"Best Barbecue in the World"
"The Live Music Capital of the World"
"Center for Urban Bat Colonies"
-
Click the first and third check boxes as the correct answers.
-
Click
to save your work.